Week 4 began with the arrival of the sail kit that had been ordered from Sailrite the week prior. Time to get the sewing machine tuned up and ready to go. Sailrite was very helpful in working through my sail options. I went with 4oz white dacron, full batons, and two reef points. The kit comes with everything needed to put the sail together including instructions. The sail panels are already cut to shape including broadseaming, seams, reef points, and baton locations are all marked out. Assembly involves seam sticking one panel to another on a hard surface, then sewing the panels together. Then reinforcement patches and reef points are seam stuck and sewed. I'm using a Pfaff model 6091 sewing machine that was aquired some years back to do canvas work and tent modifications. It has a walking foot that really helps with thicker material. On the sail, it is having no problem going through 5 layers of 4oz dacron in the reinforcement patches.
The family room has become a temporary sail loft. The plywood panel is a scrap piece of 5mm door skin. I taped the edges to prevent snagging the sail cloth. A hard surface is needed to keep tension on the sail while seam sticking the panels together to prevent wrinkles in the seams.
Above is the clew reinforcement patch being fitted.
Here are reef patches after being sewed on. Notice that I've only sewn together panels needed to get the reinforcement patches sewn on. This helps minimize the amount of material that has to be rolled up to get through the sewing machine.
Back to the boat. It was time to fill the screw holes from attaching the bottom panels and start filleting the framing.
I've turned the boat back over installed the bottom skids.
Just in case you were wondering if a respirator or dusk mask is needed while sanding epoxy covered surfaces. Check out the next two pictures.
This picture was taken about 5 minutes after a sanding session. The dust was picked up by the flash.
Here is the same scene, taken seconds later but with no flash. It may not be seen, but the dust is still in the air. Stay safe and use a respirator or at least a dust mask. No one needs to inhale this stuff.
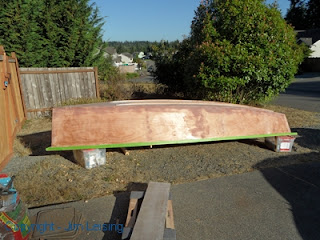
Next, the boat was taken outside for a complete sanding of the outside surfaces in preparation of painting with primer.
Let the painting begin!
The green tape is covering the gunwales and some other items I don't want painted.
After two coats of primer, I took some time to work on fairing the stem. Mike Storer suggests gluing on a thin triangular piece to fair in where the side panels come together at the bow. I decided to just fair it with thickened epoxy and reinforce with fiberglass tape.
With the boat outside, it was time to turn my attention to finishing the centerboard and rudder foils.
After spending a lot of time trying to plane the centerboard blank flat, I did the best I could and then started carving the foil into shape using the jig made last week.
The router follows the jig outer surface which exactly offsets the NACA foil shape by 30mm. Carving the shape involves several hours of laying on the garage floor while running the router to carve three inches at a time.
Here is the router on the jig in carving position. This method produces impressive piles of saw dust. After spending a couple days trying to plane the centerboard flat, and spending another day carving on it, it became apparent that the centerboard was too warped to work out. Going back to week 3, I laminated the centerboard and the rudder blanks while they were supported on top of some saw horses. Apparently, when weights were applied to keep the lamination flat while curing, they actually laminated in a slight curve in the centerboard blank. I should have done the lamination on the floor. The curve was slight, but enough to prevent me from carving the shape with the jig correctly. The same warpage affected the rudder blank. At this point, I was mad at myself. A simple oversight cost me about three days of work.
At the end of week 4, I'm about a week behind schedule. I decided to take the next week off from work to try to catch up in time for the wooden boat festival in Port Townsend, WA. Stay tuned for a full week of straight boat building.


